All about Tubes, Tube Circuits, Tube Gear

Friday, September 19, 2014

How to Wrap Cable without Damaging it


 There is an important trick that nobody is explaining but is paramount if you are hand winding cables on the elbow.

People do the elbow wind for speed.

With a rope, it doesn't matter, or at least it isn't likely to damage the rope for a long time,
and you can untangle it.

With a cable, you need to

Pro Method: (fast)


(1) automatically "roll" the cable in your fingers with your winding hand,

(2) do it by feel, in such a way that you can have zero 'twist' tension
in the direction of the roll of wire on your arm.

(3) keep shaking out the unwound end, so that the curl,
which usually BUILDS, as you ROLL the wire during the wind,
gets relieved by the unwound portion spinning to undo the twist you're adding.

This technique is critically important,
so practice it until you are sure you really know what you're doing.
And practice on one shitty cable of no value,
before you wind up your whole set of cables after a gig.

Here is my assistant demonstrating the method:


https://www.youtube.com/watch?v=xqCEyUckZTs


B. SAFE Method: (slower)


If you don't have a really strong mechanical sense of
what is going on with the cable, and you can't feel the
twist of the cable in your fingers,
DON'T use the elbow-winding technique.

Instead do it the slow way,
by
(1) Holding the loops at the top,

(2) pulling up a loop, and twisting the whole roll of loops
from above, in the direction that relieves the tension,

(3) seating the new loop on top of the others, always same side up.

Here is my assistant demonstrating the method:
https://www.youtube.com/watch?v=TIuBlZXLN2M


 Fixing Cables:

You can also restore a cable sometimes, depending upon how the cable has been twisted.

What appears in the OP photo is that the outer protective rubber has been pulled away from the inner wires and fiber,
and also that the inner wire package has been twisted in relation to the outer housing.

In this case, sometimes the cable can be easily fixed (if not too severe),
by a combination of stretching lengths of the cable by hand,
and shaking down the section to cause the inner cluster of wires
to return to their natural positioning (twist-wise).

Also, pulling on the outer housing can also relieve the built-up stress
in any cable housing, and stroking the cable through the hands
in the appropriate direction.
You pull on the outer housing, with a heavy slow friction,
and this will relieve the tension, twist, or bunching that
has built up inside the cable between the outer rubber cover,
and the inner wire cluster and reinforcement rope/housing.

With MICROPHONE cables you have to try these techniques very gently,
since you can "unwind" the shielding, and cause the cable to lose its
electromagnetic field and RF protection, becoming a 'noisey' cable.

Good cables use a braided shield, which can't be damaged by unwinding.

CHEAP mic cables use a simpler wound "wrap" which is easily mucked up.

You can check the type of cable by pulling back an end and looking at the shielding
to see if its braided. If it isn't, sell the cable and by a better one.

Wednesday, September 17, 2014

Yorkville Sound TL352 PA Cabinet


 Yorkville Sound TL352 PA Cabinet.

I have been working with PAs off and on for decades,
starting way back in the 80s with Cerwin Vega bins, and JBL horns.

I have always kept an eye on Yorkville Sound's products,
as they are a local manufacturer here in Toronto, and are
famous for their Trainor Guitar amps, used by rock players
for years, and now coveted tube gear.

They have now been in the PA supplying business for quite a while,
and have been a staple supplier of PA gear through
Long & McQuade Music Stores across Canada.

This meant their gear had to survive the inevitable torture
and abuse of both touring and rentals. As a result,
Yorkville Sound have taken that experience to heart,
and produced some of the most rugged and durable,
and even near-bulletproof PA gear around.

I finally purchased a couple of PA cabinets from their "Pulse Series" line, which is a medium cost build.

The first thing I did was pull the horn to see what kind of
thing was going on. I was astounded; inside as advertised
was a Celestion 100 watt compression driver, but most
importantly, was the way they had the driver bolted into
a 1" thick plywood framework to make it immovable and
immune to the cabinet dropping 10 feet.

(most cheaper cabinets have drivers screwed onto horns
which support the weight of the driver, up to 7 llbs.
When a cabinet like that is dropped, the driver can be sheared
off of the horn, or the ABS plastic horn can be simply snapped off.)

Next, I pulled the woofer, and was very impressed with this
massive custom Eminence Driver rated at 400 watts, with giant
black enameled steel plates and cooling vent.

The biggest surprise was the huge heavy-duty crossover,
which actually stunned me. I have never seen a bigger,
heavier, tougher-made crossover than the monster bolted
into the bottom of this cabinet.

Even with 40 years on an electronic tech bench,
I have never even seen the gigantic (50-100watt?) resistors
they used here. (Of course I've seen power resistors,
in Hydro gear, but not in audio equipment before.)

The coils were similarly massive, and plainly made
very credible their claim of a 400 watt power handling capability.

If you ever rent one of these cabinets, take a peek inside;
I think your jaw will drop when you compare this tank
to average PA cabinets.

I know they have had a longstanding policy of building tough,
but this cabinet surpised me even though I was prepared
to see a good build.

As to the sound:

They have chosen a design in this series with crossover points
between 2000 Hz and 2100 Hz
. This results in a very smooth
upper mid between say 2000 and 6000 Hz.
Other manufacturers crossover much higher, to protect
cheaper horn drivers from overload and burnouts, but
making the 15" woofer try to cover between 3000 and 5000 Hz
usually results in wonky uneven frequency response, as
the inductance of the speaker kicks in and the piston surface
begins to "break up" (flex and develop standing waves).

By crossing so low, they let the horn handle this critical range.
The horn is then protected from overload by various circuits
such as the 'lamp bypass' and varistors etc.
This PA bin is similarly protected with an automatically resetting
circuit incase of feedback or overload.

In a previous set of different cabinets, I replaced the crossover
with a 4th order LR at 3.5 kHz, and got a very acceptable sound. I had chosen the higher frequency to protect the horn compression driver also.

I don't think the Yorkville Sound PA box has such a high order crossover, but they have approached the problem differently,
with a lower frequency and protection circuits.
The result is a very smooth sound in which the woofer is
relieved of having to provide higher frequency coverage.

The birch plywood box is built like a tank, and I expect that
this unit can take a lot of abuse, and is the type that you'd
rather maintain or repair than replace.

Hats off to whoever is in charge of their quality control and
design specs, as they have produced something like the highest quality product one could hope for, with top notch components and drivers, and a supremely heavy-duty build.

What are the drawbacks?

Only one I can see: These cabinets are heavy,
and although not that large, two will fill the backseat of a car.
You will need a pickup to move an entire PA built around these cabinets. And they are alot easier to lift with two people.

I would have liked to have seen metal handles,
but the recessed ABS-style handles seem well-made.

The cabinet is covered with a tough plastic/fibreglass type coating that seems very scuff resistant (unlike rugs and paint), and looks like it will hold up visually over time.

I thought I was going to swap out the crossover,
but once I saw the monster that was in there, I decided
to leave it as is.

Very pleased with this purchase, so far, and
I have to say picking up a used pair at Long & McQuade
was the bargain of the century.
Not only a great product, but L&M gave me a warrantee as well!!!

I'm going to road these locally and I consider this
one of the most robust components of my rigs.

Summary:

Sound - Great.

Build - Awesome.

Drivers - Top Quality.

Crossover - powerhouse.

Box - a tank.

Handles - (minor worry: wish they were metal)

Finish - durable.

Grill - metal curved grill, non-existant rattle issues.

Connectors - Speakon / Phone.


My score: 95% of my wishlist met.


Friday, July 11, 2014

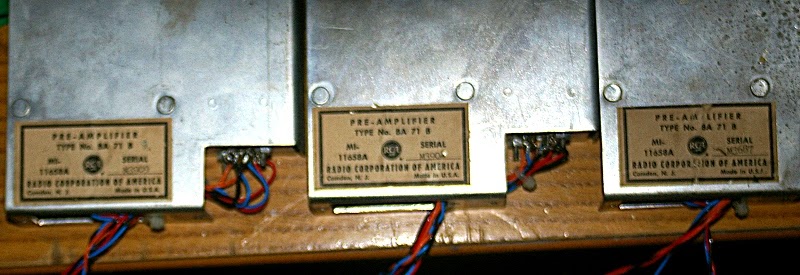
RCA Golden Age Microphone Preamps BA-71B


 What equipment did Elvis and Harry Belafonte use to get those sweet sounds?
Well, RCA equipment back in the day (1950-1970).

There were the now famous 44 and 77 Ribbon microphones,
and of course the RCA consoles, with their modular microphone preamps,
first off the OP7 (tube gear) and finally, in the 60s and 70s, the first transistor preamps, like the BA-71B.

The care in design and pioneering skills of the early RCA engineers became legendary, alongside the artists that helped make recording equipment coveted.

Being a bit of a packrat, I had picked these up surplus and squirrelled them away to restore and use them. 


RCA BA-71-B Microphone Preamps! 


I replaced the wiring and removed the connector sockets, in order to hook them up to XLR plugs in the early 1990s to test them as outboard units.   My boss at the time didn't think they amounted to much, as people back then didn't think of these as 'vintage' but just 'recently old'.   Now however, interest in vintage gear has both revived and expanded to include a wide array of audio gear.

 I've decided to finally follow through and restore at least one for myself, and possibly sell the others.  These units are now fetching interest at a much higher price-point than what I first got them at.


Here are some examples of prices (at least asked) on Ebay for both unrestored ('As Is') and fully restored and enhanced versions:


So it doesn't seem unreasonable for me to ask about $275 each for mine,
'As Is'.


Friday, July 4, 2014

Fixing Up a Behringer 31 Band EQ


On Amazon, under the listing for the FBQ3102 31-Band Stereo Graphic Equalizer, you may find the following notes in the review section:

"This equalizer works fine and is easy to use. But I am uncomfortable with the high heat it generates. It gets VERY hot on the back panel around the sub output. It gets so hot in that area, it hurts to keep a finger there. This is very strange as the heat is generated even when the EQ it not wired to anything but the A/C power. It is not on top of warm equipment either. I have observed this high-heat behavior on two units. Two different calls to Behringer yielded two results. The first time it was suggested that I exchange the device, which I did. The second time I was told the heat was O.K. Weee, multiple choice from customer support."  (By Dr. James Williamson on July 15, 2010)"

In fact, one will find (on Musician's Friend, Amazon, and other sites) many mixed reviews with this and other similar products (low end home-studio, inexpensive semi-pro equipment).

These units (many brands and models) all seem to fail frequently in partial functions or even completely, after heavy use or leaving them on for extended periods.

This can almost always be traced to HEAT PROBLEMS as a result mainly of cutting corners and assuming that consumers will not run the units 24/7 or for more than an hour or so at a time.

The manufacturers typically use smaller heat-sinks (or no heat-sinks at all),
or they skip on fans, or provide poor ventilation to allow heat to escape at
an adequate heat-transfer rate for continuous use (i.e., extended on-times).

On the one hand, you will read great reviews praising the performance of the products, and on the other hand you will also read seemingly contradictory horror stories of how these products fail after only moderate extended use, often just outside the warranty time limits!.

This is precisely what is to be expected.

Luckily there are solutions.

If you're trying to save a few dollars with these inexpensive units,
and since the warranty will rarely work in your favour anyway,
you can take a bit of risk voiding the warranty and instead modify
the unit so that it at least has a chance of functioning normally
and without problems under extended or continuous use.

This usually means providing better ventilation and heat-transfer,
and even adding fan-cooling or larger heat-sinks or metal components.

Here's what we did to deal with the heat problem on our 31 Band EQ:

First, we opened up the unit to discover a lot of empty space in there,
and one seemingly adequate, but unfortunately sealed, heat-sink
in the input area at the top, which accounts for the high heat you can
feel on the top of the left side of the case when its powered on for any
length of time.

I was initially thinking I would add a heat-sink to the outside, so as
not to deface the unit, by gluing it on.    But inspecting the inside showed
me that this would not really work.  The chip doing the heating was not
screwed to the case as I anticipated, but had its own heat-sink already,
which was not touching the case at all!

This is doubly disturbing, since the case was incredibly hot in spite of
not being connected directly to the heat-sink.

Obviously the real problem was no ventilation, not no heat-sink.

Heat-sinks can't operate properly unless there is some air-flow that can
transfer heat continuously to the outside without build-up.

So I took a 'nibbler-tool' and cut a square hole right above the heat-sink,
and also one on the bottom of the unit about the same size,
so that air can flow naturally by convection up through the bottom,
over the heat-sink fins, and exit the unit at the top.


HOLE CUT ON BOTTOM WITH SCREEN TO KEEP OUT INSECTS, MICE, DUST

Also of concern if you are 'roading' the unit is to make sure things you do can't introduce more problems: I used some Locktite on the nuts holding the screen in place above, just to make sure that they didn't work loose and start bouncing around inside the case, shorting out electrical components. You can also just use a bit of paint or glue, to make sure screws don't come loose with jiggling over time.

To prevent injury, I also filed the sharp edges of the hole I cut with a file,
and then 'painted' the edges with a permanent magic-marker to remove
any unsightliness.


UNIT MAY BE OUT OF WARRANTY BUT STAYS COOL!


This seems to have solved the heat problem, but keep in mind that
these window-vents might get blocked still, if the unit is mounted tight against
other equipment in a rack.

USING A TILTED RACK KEEPS VENTS UNBLOCKED,  AND MAKES UNIT EASY TO READ WHILE MIXING.


There is also plenty of space on the back of the unit to cut a hole,
instead of the bottom, if that is better in your situation. (e.g., if the bottom hole will be blocked otherwise.)  I cut the bottom because it would be less visible,
and I had planned to tilt the unit in a special rack.


Another way to protect EQ units is to use them properly.

Here you can see I have left EQ centered and flat except for
subtractive notches to take out room-boom and feedback points.
No frequencies are boosted, because that is better done with wider Q
tone controls on the channels and mains, i.e., a parametric EQ.


The very ends of bass and treble can be rolled off too,
to protect bass speakers and remove harshness from horns.

EQ should be used in an insert on the mixer board so that what it
is doing to the sound can be monitored at the board with headphones,
for both Front of House (main FOH) or monitors (e.g., stage monitors with
a separate EQ channel).


Thursday, May 15, 2014

New Live PA Monitors from MAX Professional! WOW

I'm so excited about these new PA speakers!

One of the perenial problems with smaller live gigs in bars, coffee shops, churches, pizza places and community centers is vocal sound quality.

Typically, the sound systems are old, crappy, old-technology, rentals, abused, set up wrong, and the equipment is worn out or damaged from mishandling and careless use.

Even careful EQing, volume adjustments, positioning, and training singers and speakers often results in a final sound that is depressingly poor, leaving the performer sounding like they have cotton in their cheeks, and a horrible lisp.

Two of the key weak points in the sound chain are the microphones (and channel inputs), and the PA speaker system.


Frank Fabian , the chief designer behind the MAX Professional line of speaker and sound products, was well aware of the problem of providing the highest quality sound reproduction through the speaker system, at adequate volumes and modest and attainable price points.


One of these brilliant designs is the pair of speakers I have taken on now as my main workhorse for live PA sound for local gigs in coffee shops, churches and bars.

These speakers are phenomenal in sound!


 They come with 12" drivers custom designed for the MAX Professional line,
with incredible power handling and a deep flat range that allows these units to be used alone with vocals and acoustic instruments (including upright basses!) and also in combination with a suitable subwoofer system for active crossover configurations.

One of the most important components is the ultra-low distortion horn driver, which has a sparkling clarity that is jaw-dropping at all volume levels.
These cabinets perform with a clarity that is astounding.

Of special interest is how complimentary they are in combination with superior microphones and a good solid professional board, such as the Soundcraft series.
These mixing boards can deliver a stunning sound on their own, but can only truly shine their best with a speaker system capable of revealing the rich detail and lustre of the Soundcraft input channels and front end.

We are doubly floored by the combination of this mixer / speaker configuration with Frank Fabian's professional series microphones, which feature larger, more robust capsules and a sensitivity and flatness that is astounding in its own right.

I should mention some other great and practical features:

Pole-stand mounts on the bottom so they can be placed at appropriate heights in any situation.
Locking phone-jack inputs, which prevent accidental unplugging of speaker cables, and
SpeakOn connectors as well! so a variety of cables can be used.

These speakers easily handle 350 watts per cabinet of pure sound joy.


I'll be reviewing Frank Fabian's microphones in a future article!


Sunday, March 9, 2014

Overdoing and Removing Cavity Shielding

Without making too much out of the loss of treble / sparkle due to ground/shield capacitance, it is true that this effect is quite measurable and audible, and can also lead to undesirable side-effects.

The Zexcoil fellow recently studied shielding on cabling from pickup to controls as a result of some anomalies noticed in cable brands, and as a side-issue he measured also the capacitance effects of cavity shielding. I believe he measured conductive paint (graphite) used to shield pickup cavities, but one should expect that even more dramatic effects will be found when using copper shielding.


Copper Shielding

Some recommend copper as preferable because it is a much better conductor, and a better Radio Frequency (RFI) shield for noise reduction. And this has become more important in a heavily polluted radio environment we now live in, with multiple sources of interference, from cell-phones to satellites.

To get equivalent shielding with conductive (graphite) paint, one must usually use two or three coatings and build a thick layer.

However, a disadvantage of copper is that it is also a natural capacitor.

This capacitance effectively bleeds treble to ground, and can also cause or alter natural resonances and frequency response.


So people have discovered on their own that removing either paint or copper shielding restores the sparkle or clarity and dynamics of single coil pickups, and even modern noiseless ones.

The drawback is that of course the noise and hum returns to the signal path.

I recently acquired a MIJ body already fully shielded with copper, and routed only for single coil size pickups. Obviously the concern was that I would lose the expected sparkle and dynamic response from either single-coils or stacked noiseless pickups.

Looking at the problem closer, it was obvious that far too much shielding was used to shield the cavity, and that much of it was superfluous and could be removed while retaining most of the effective shielding of the cavity.

For instance, as I will show in the photo, a large amount of the shielding inside each pickup cavity can be removed without degrading shielding.

The inside facing, and sandwiched walls do not need to be shielded in these cavities, because they are already shielded by the outside walls and edges.

Removing the copper from these sides dramatically reduces the stray capacitance of the cavity, while preserving the shielding against outside RF sources.

 Photo 1:

Here you can see where I have cut out the top half of the shielding in the middle pickup cavity.   The middle pickup is certainly heavily shielded already from being sandwiched between the other two cavities.    Stray RF coming at the guitar endwise is caught by the outer shielding and the other pickups.


 Photo 2: 

Here is shown that much copper laying in the bottom of the cavity has been cut out, drastically reducing the stray capacitance expected along the cables/wire leads running from pickups into the controls area.  This copper does little to shield the pickup network from RF, but adds a significant amount of capacitance to ground for the signal path.  Also, the copper is an added hazard that can short out or ground bare wire, eyelets or solder-points on the back of a pickup, if it is lowered too far into the cavity.


If the pickups are not suffiently brought back to life by this removal,
one can go even further, either leaving narrower strips, or simply disconnecting most of the copper from ground. There is no need to remove all the copper unless the results are not satisfactory. Its a law of diminishing returns here, and some shielding is desirable, even with "noiseless" pickups.


Saturday, March 1, 2014

Lace Holy Grails - Swelling of Pickup

I bought some used Lace Holy Grails on Ebay.

When they got here, I started to install them in an Anodized PG,
and noticed they had swollen somehow, so that the plastic covers
(which are glued on with these ones) were binding in the hole,
and preventing the pickups from rising up higher without forcing.

I don't want to file the anodized (new) pickguard,
although I probably would have, if it were simply a plastic one.

I am suspicious that either the glue melted in the sun or was a poor choice
in the first place.

I haven't established whether the pickup covers were originally glued on,
i.e., by Lace, or if this was done by previous owner(s) to prevent them rattling or being removed.

If anyone has Lace Holy Grails, I'd like to know if the covers are glued on.

Secondly, I am wondering what the cause for the swelling is:

(1) glue swelling or bubbling over time,

(2) glue reacting with potting / coatings in coils.

(3) glue partially melting or swelling in the sun (the pickups have a noticable brownness to the tops (only).

(4) I am also wondering if someone had previously tried to darken or age them using coffee staining or heat. This might have damaged the original glue and/or expanded the plastic covers.

(5) Someone perhaps using improper glue to fix the covers and this just not working out one way or another.

(6) Maybe someone tried to heat and soften or loosen the glue, to remove the plastic covers and see inside, but this tactic failed? Now the pickups are out of shape.

I am obviously concerned because any tampering may have also affected the sound or reliability of the pickups, even if they appear to function.

Does anyone have experience owning, examining, and/or installing these pickups?

Notably, do they come glued together?

Has anyone ever had problems with them swelling or binding in slots?